깃블로그(11) 아카이브 페이지의 출력포스트 list UI 꾸미기
아카이브 꾸미기 개요
: 나의 사이트에 카테고리페이지를 클릭하면 레이아웃이 archive 로 설정된 page 가 호출된다. (모두 archive 레이아웃으로 설정해놨다.) 이러한 카테고리페이지(아카이브 레이아웃)에서 하위에 포스트들이 출력될때 UI를 변경한다.
아카이브 페이지란?
아카이브 페이지란 페이지들 링크 모아둔 페이지이다. 이를 아카이브 페이지라고 한다. 내 화면은 모두 이 레이아웃으로 구성되어있다.
각 포스트(싱글페이지) 링크가 어떻게 보여질지에 대한 문서이다. 이 블로그의 홈에서 Recent Pages가 나오는데 이런게 바로 아카이브 페이지라고 한다.
- 게시글 제목옆에 카테고리명 출력
- 게시글 제목옆에 작성날짜 출력
기본 구현
: 기본적으로 날짜와 카테고리명을 조그만하게 추가정보처럼 출력해주는 효과를 구현한다. (아래 파일에 주석된 부분에 작성하면 끝이다.)
/_includes/archive-single.html
<div class="{{ include.type | default: 'list' }}__item">
  <article class="archive__item" itemscope itemtype="https://schema.org/CreativeWork">
    {% if include.type == "grid" and teaser %}
      <div class="archive__item-teaser">
        <img src="{{ teaser | relative_url }}" alt="">
      </div>
    {% endif %}
    <h2 class="archive__item-title no_toc" itemprop="headline">
      {% if post.link %}
        <a href="{{ post.link }}">{{ title }}</a> <a href="{{ post.url | relative_url }}" rel="permalink"><i class="fas fa-link" aria-hidden="true" title="permalink"></i><span class="sr-only">Permalink</span></a>
      {% else %}
        <a href="{{ post.url | relative_url }}" rel="permalink">{{ title }}</a>
      {% endif %}
    </h2>

    <!-- 이곳에 작성 -->

    {% include page__meta.html type=include.type %}
    {% if post.excerpt %}<p class="archive__item-excerpt" itemprop="description">{{ post.excerpt | markdownify | strip_html | truncate: 160 }}</p>{% endif %}
  </article>
</div>
게시글 제목옆에 카테고리명 출력
: 게시글 옆에 카테고리명을 출력한다.
<!-- 카테고리만 보여주는 코드 -->
{% if post.categories[0] != null %}
<p class="archive__item-excerpt"><i class="far fa-folder-open"></i> {{ post.categories }}</p>
{% endif %}
게시글 제목옆에 작성날짜 출력
: 게시글 옆에 작성한 날짜를 출력한다.
<!-- 날짜만 보여주는 코드 -->
<p class="archive__item-excerpt"><i class="far fa-calendar-alt"></i> {{ post.date | date: "%Y/%d/%m" }} </p>
모두 출력
: 카테고리명, 날짜 모두 출력한다.
{% if post.categories[0] != null %}
<p class="archive__item-excerpt"><i class="far fa-calendar-alt"></i> {{ post.date | date: "%Y/%d/%m" }} <i class="far fa-folder-open"></i> {{ post.categories }}</p>
{% else %}
<p class="archive__item-excerpt"><i class="far fa-calendar-alt"></i> {{ post.date | date: "%Y/%d/%m" }}
{% endif %}
적용 완료
: 아래와 같이 날짜와 카테고리명이 게시글마다 조그만하게 출력된다.
심화 구현
: 기본적으로 날짜와 카테고리명을 조그만하게 추가정보처럼 출력해주는 효과를 구현한다. (아래 파일에 주석된 부분에 작성하면 끝이다.)
/_includes/archive-single2.html (생성)
페이지 내부의 포스트 출력 로직에서 기존의 archive-single.html 을 이용하지 않고 새롭게 만든다.
/_includes/archive-single2.html
{% if post.header.teaser %}
  {% capture teaser %}{{ post.header.teaser }}{% endcapture %}
{% else %}
  {% assign teaser = site.teaser %}
{% endif %}

{% if post.id %}
  {% assign title = post.title | markdownify | remove: "<p>" | remove: "</p>" %}
{% else %}
  {% assign title = post.title %}
{% endif %}

<div class="{{ include.type | default: "list" }}__item">
    <article class="archive-item">
        <div>
            <span>
              <a href="{{ post.url }}">{{post.title}}</a>
            </span>
            <small>
              <i class="fas fa-fw fa-calendar-alt" aria-hidden="true"> </i>{{ post.date | date: " %Y.%m.%d" }}
              {% if site.category_archive.type and post.categories[0] and site.tag_archive.type and post.tags[0] %}

              {% endif %}
            </small>
        </div>
      </article>
</div>
이어서 만든 archive-single2.html 문서를 페이지 로직에 적용시키면 끝이다.
/_pages/categories/blg-category-gitpages-dev.md
---
title: "gitpages dev"
layout: archive
permalink: /categories/gitpages-dev/
sidebar_main: true
author_profile: true
---
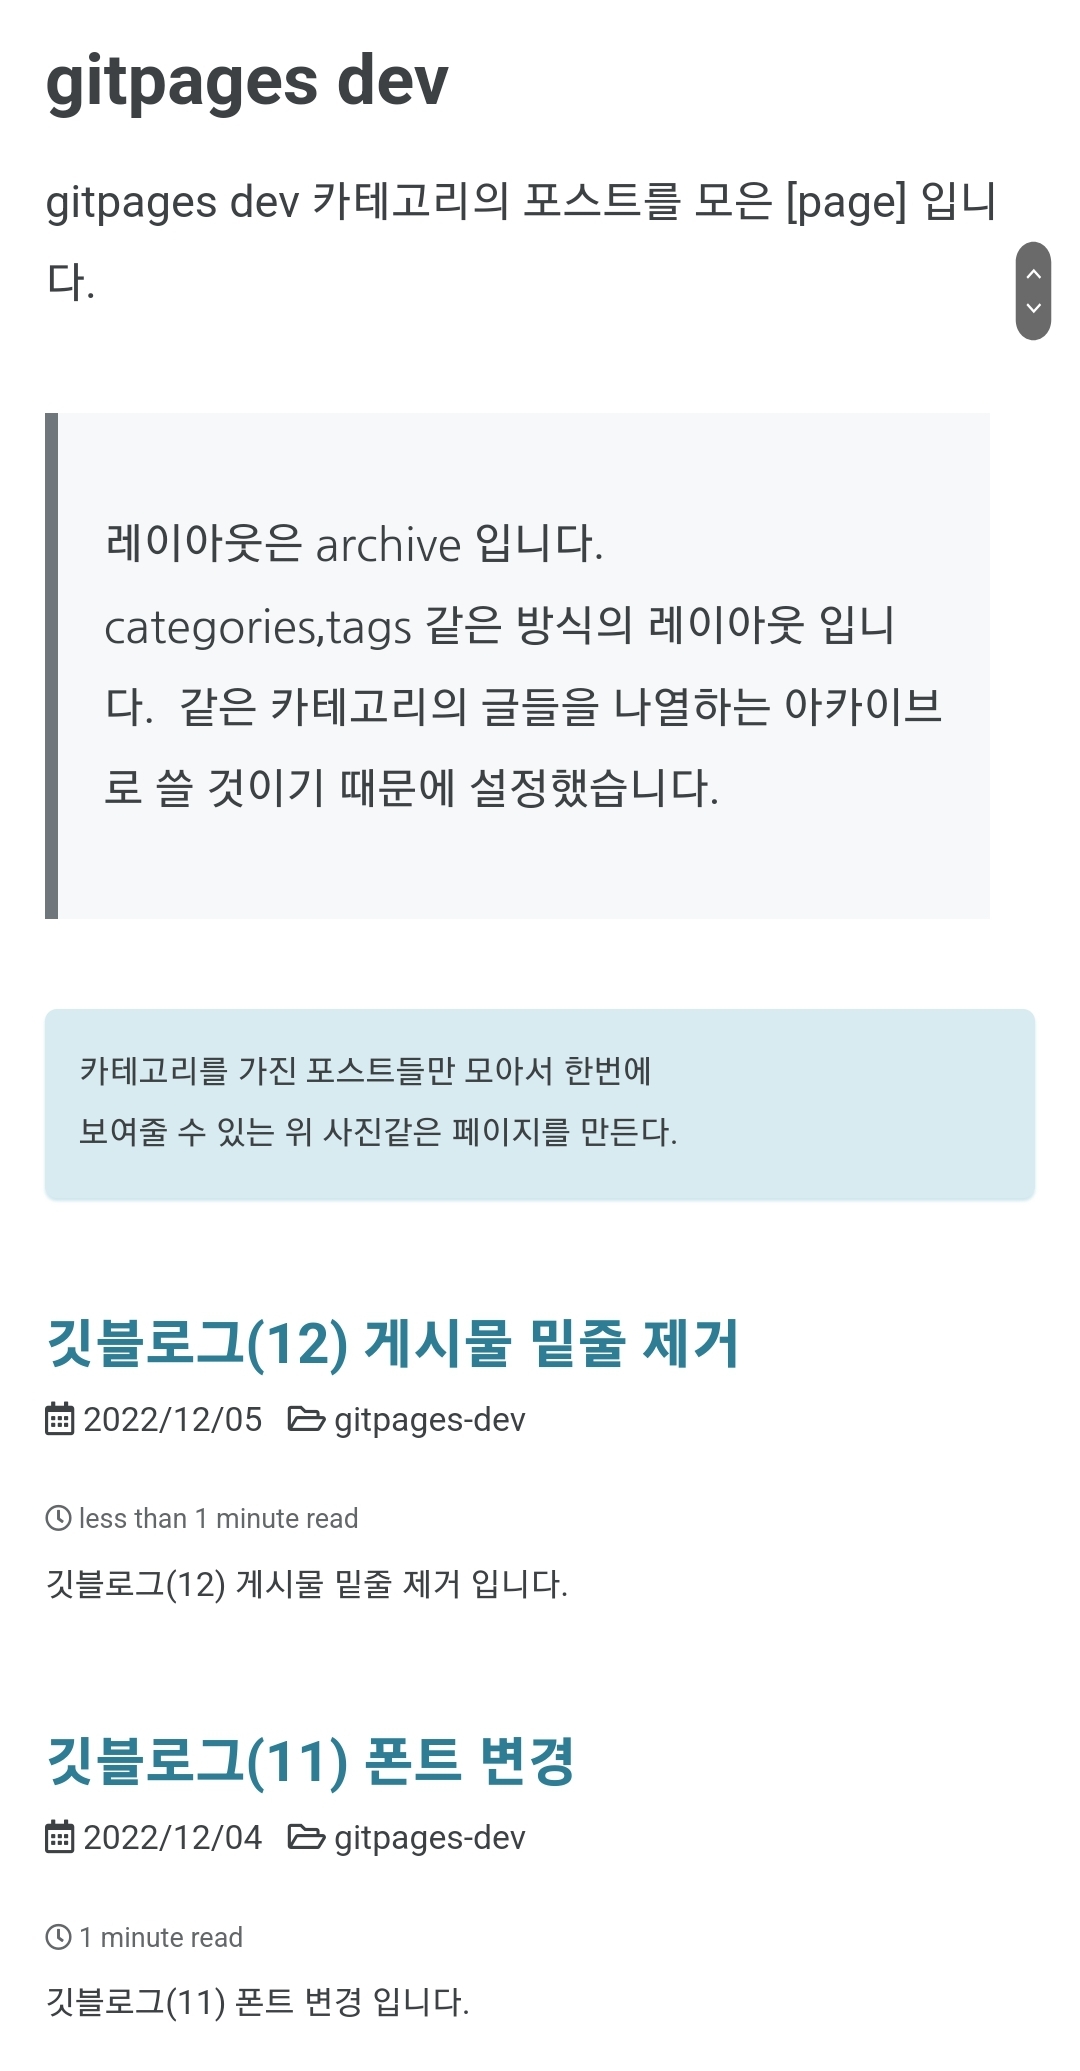
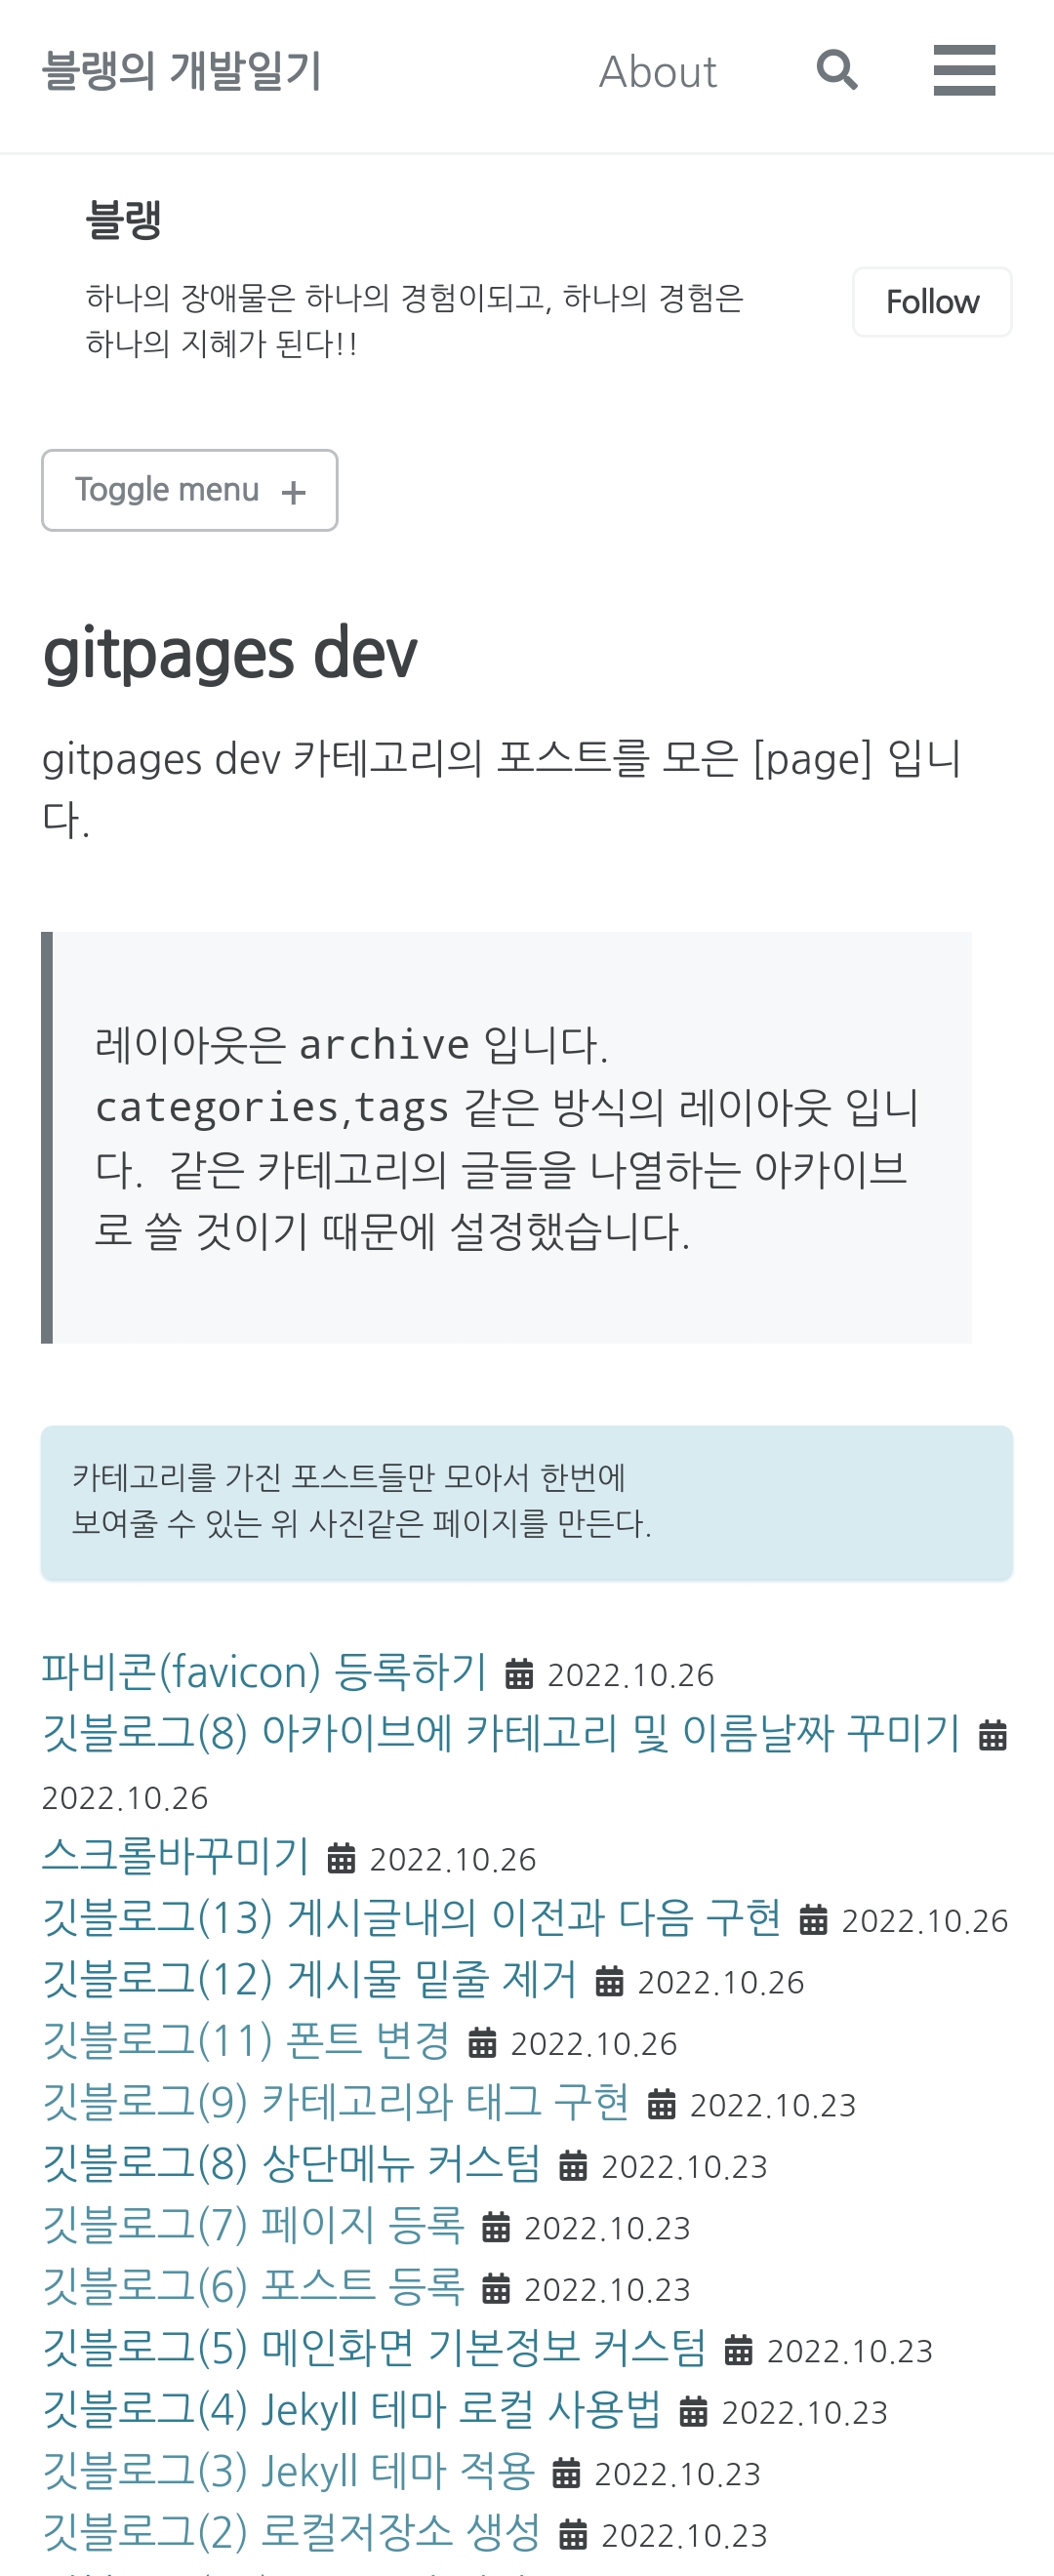
gitpages dev 카테고리의 포스트를 모은 [page] 입니다.
> 레이아웃은 `archive` 입니다.
> `categories`,`tags` 같은 방식의 레이아웃 입니다.
> 같은 카테고리의 글들을 나열하는 아카이브로
> 쓸 것이기 때문에 설정했습니다.
카테고리를 가진 포스트들만 모아서 한번에
보여줄 수 있는 위 사진같은 페이지를 만든다.
{: .notice--info}
{% assign posts = site.categories.gitpages-dev %}
{% for post in posts %} {% include archive-single2.html type=page.entries_layout %} {% endfor %}
아래와 같이 리스트 ui가 기존보다 간략하게 커스텀되어 변경되었다.
Leave a comment